
MidCOM is component framework for PHP running on top of the Midgard framework. MidCOM provides a full Content Management System based on a series of components. MidCOM users can build their websites by "clicking together" a directory hierarchy, each folder being managed by the appropriate component.
MidCOM components are distributed as PEAR packages that allows easy installation and maintenance of the environment.
Downloads
Installing MidCOM with PEAR
MidCOM releases are shipped as PEAR packages for better version management and control. The packages utilize a MidCOM-specific channel in ragnaroek.pear.midgard-project.org.
The Datagard tool in Midgard1 performs all required steps to initialize all channels (Ragnaroek, HTMLPurifier, etc) and install all initial base packages. If you are only interested in installing PEAR packages, run datagard with desired action type:
# datagard -a pear
Keep in mind, that PEAR action removes old MidCOM if found, and install new packages from new channel.
Useful information:
- Channel URL: ragnaroek.pear.midgard-project.org
- Channel alias: ragnaroek
If, for some reason, some package is not installed or it's not included in base packages, install it manually:
# datagard -a pear -p package_name
When a package is installed via Datagard, the tool will take care of all the necessary actions like updating Midgard database tables.
How MidCOM works
Ideally, a MidCOM-based web site consists of one or more MidCOM Components only, though Midgard's fundamental design makes it very easy to use MidCOM along with traditional Midgard applications or web sites and even with plain file-based web content.
Every Component contains a complete application module: It might depend on other Components to work, but it should fulfil a defined task independently. For example, a MidCOM Component could handle the management and display of a certain article type ("product information", "news item") on a web site. In a web-based application environment, it may contain the whole web frontend of a custom-built CRM system. After all, it is up to the Component author to define how broad or narrow to design its features.
Technically speaking, MidCOM establishes a Model-View-Controller concept within Midgard. This specification primarily defines the outline of component packaging. A component in this sense is the combination of business logic (what to do), default configuration (default data structure, default operation mode) and default style (default presentation information).
A correctly designed component can be deployed to another Midgard installation by simply installing the component's PEAR package and creating a site-specific style (HTML design) for it. Therefore, the ideal MidCOM Website completely relies on its components having no application-specific logic anywhere else than within the components themselves.
Each component exposes a strictly defined interface to the underlying MidCOM framework and Midgard itself. MidCOM uses Midgard's topic tree to link incoming HTTP requests to their corresponding Components, thus controlling a Component's assignment to a certain area of a web site or a certain type of content object. Using the topic tree instead of the page tree - which has the same role in traditional Midgard environments - gives users much more flexibility for providing advanced features.
The MidCOM framework passes requests to the Components, provides support for them in several areas (such as building a consistent navigation interface for a complex web site with multiple independent Components) and assembles their data management capabilities into a single administration interface to the user. For example, a secretary managing the news and press sections of her company web site does neither feel nor needs to know that she is working with two different Components as she makes her changes within a consistently designed CMS interface.
Modifying component output
MidCOM components use the style engine for all their output, meaning that site builders can easily modify all component output by simply overriding templating.
Default style elements
MidCOM components ship a set of templates that are stored in the style subdirectory of the component.
The template files are regular PHP files that are executed in their own context.
Example: Templates of net.nehmer.blog in SVN
Overriding the templates
You can override any output template of a component by logging into Asgard and creating a new substyle under your site's style. It is a good idea to name the substyles according to their use, like Photo gallery or Blog.
Then copy the style template that you want to override from the component and create a midgard_element with the same name (but trailing .php removed) under your new substyle and paste the contents there. Make some change and save it.
Then log into your site and click Edit Topic. In the editor you'll have a pulldown for selecting a Style. Select your new substyle.
Then simply go to the site and see how the changes have taken effect.
If your site uses output caching, you might have to access the /midcom-cache-invalidate URL first.
Dynamic Loading
Dynamic Load is a MidCOM method which loads content dynamically from components.
Example: loading 5 latest news items from a net.nehmer.blog folder:
<?php
  $_MIDCOM->dynamic_load("/news/latest/5");
?>
Substyles
Dynamic load can also be used to utilize a substyle for component's output:
<?php
  // Using a substyle called 'frontpage'
  $_MIDCOM->dynamic_load("/midcom-substyle-frontpage/news/latest/5");
?>
The used substyle is loaded as a child style under the style which is used for the loaded folder.
Setting up Squid reverse proxy
On high-volume sites significant performance improvements can be attained by setting up a reverse proxy in front of the actual Midgard, Squid is a popular choice.
Caveats
Obviously since we're aggressively caching stuff it will normally take at least the lifetime of an object before it's refreshed from main server and thus your changes to the content will appear with some delay. Also since we're not sending MidCOMs usual 'must-revalidate' headers, some clients (yes, that would be IE) may cache the pages locally for much longer...
Setup options
This document covers a single machine proxy and Midgard setup, Squid makes it possible to make clusters of proxies for even higher performance, see Squid documentation on how to do that.
For our case we have basically two options:
- One (public) IP for Squid and another (public or internal) for Midgard
- This has the advantage of simplifying installation and management as long as the Midgard IP is reachable by the content maintainers.
- It also simplifies Midgard/MidCOM headers debugging
- One (public) IP for Squid and 127.0.0.1 (localhost) for Midgard
- In this case access to the content management becomes troublesome but for staging-live setups this works well.
The third option of having Midgard and Squid in same IP but different ports has a problem with the fact that a lot of places use MIDCOM_NAV_FULLURL in stead of MIDCOM_NAV_RELATIVEURL (and in some cases they don't really have much of a choice), where the nonstandard port is then added to the constructed URLs everywhere, bypassing the cache from first hit onwards...
Midgard setup changes
Set up apache to bind specifically to the chosen IP (here we use 127.0.0.1), basically comment out all Listen and NameVirtualHost directives you can find and then add new ones to /etc/midgard/apache/httpd.conf
Listen 127.0.0.1:80
NameVirtualHost 127.0.0.1:80
Then in each file in /etc/midgard/apache/vhosts change the <VirtualHost *:80> to <VirtualHost 127.0.0.1:80>
Squid setup
Install normally, make sure Squid can resolve the servers IPs to names (edit /etc/hosts if needed). Then set up as reverse proxy by changing the following settings in /etc/squid/squid.conf.
Acceleration options with Squid 2.5
http_port "public-ip-address":80
httpd_accel_host "127.0.0.1"
httpd_accel_port 80
httpd_accel_uses_host_header on
Acceleration options with Squid 2.6
http_port "public-ip-address":80 vhost vport
cache_peer "public-ip-address"    parent    80  0  originserver default
Access control options
Then add ACLs for allowing your site to be proxied, here's one example but I recommend reading the Squid documentation on ACLs
acl valid_dst dstdomain .example.com
http_access allow valid_dst (Just before deny all!)
MidCOM setup
in code-init of your host(s) add the following settings:
$GLOBALS['midcom_config_local']['cache_module_content_headers_strategy'] = 'public';
$GLOBALS['midcom_config_local']['cache_module_content_default_lifetime'] = 60;
Adjust the default lifetime as you see fit, this is in seconds (in case the document has no expiry set via metadata then the expiry is set to current time plus the default lifetime, lower values significantly reduce the advantages of proxy)
You can also use 'private' in stead of 'public' in case you need that kind of cache-control, but be aware that currently whenever a user is logged in midcom enters no-cache mode due to uimessages service unconditionally using sessions.
Testing & Troubleshooting
Read Six Things First-Time Squid Administrators Should Know from ONLamp.com.
Remember to restart Squid and Apache after each configuration change, only test one change at a time, keep log of what you changed, where and why.
First test a few times with
lynx --dump --head http://www.yoursite.com/
look for headers indicating cache miss/hit, if you get only misses increase Squid logging and see in the store and squid logs exactly what happens.
If a page is released immediately from the cache there are a few options:
Cache-Controlheaders are incorrect- Use lynx or telnet to examine the headers you get from Midgard
- If you get
Cache-Control: no-store, no-cache, must-revalidateheader then MidCOM is in no-cache mode for some reason.
Content-Lenghtheader is incorrect- For some reason in some cases there is extra whitespace sent in MidCOM output, for this reason we try to avoid sending Content-Lenght header when headers_strategy indicates caching.
- See Squid debug level log, it should complain about server sending more data than announced.
Expiresis now or in the past (remember that the header is in GMT, so what might seem like past at first sight perhaps is not...)- Make sure the document does not have expiry set to past (though normally it shouldn't be then available on the site at all).
- Make sure the default_lifetime is sensible.
Performance testing
Get Siege and create urls.txt with one url per line, this should contain enough urls from your site (dump a sitemap or something), then in one window:
tail -F /var/log/squid/access.log
And in another
siege -c 30 -i -t 5m -f urls.txt
And see what happens. Tune Squid as needed, below are some settings I have used:
cache_replacement_policy heap LFUDA
memory_replacement_policy heap GDSF
cache_dir ufs /usr/local/squid/cache 20000 16 256
cache_mem 500MB
maximum_object_size 12000 KB
Forcing cache refresh / precaching
You can use wget to precache your site and/or to force a cache refresh for the whole site with the following command:
wget -t 3 -T 3 --no-cache -q -m www.yoursite.com
For forcing refresh of single page in the cache, go to the page and 'shift-reload' (or whatever works on your browser for forcing it to reload the full page from server).
Site search using Solr
Solr is an open source enterprise search server based on the Lucene Java search library, with XML/HTTP and JSON APIs, hit highlighting, faceted search, caching, replication, and a web administration interface. It runs in a Java servlet container such as Tomcat.
That means that to use Solr you will need to run in some Java servlet container.
Using solr-tomcat5.5
On Ubuntu et co we have this package available and dependency of the midgard metapackage, so after installing just do the following:
- Make sure the Catalina process uses UTF-8 for URI parsing
- Download the MidCOM Solr Schema and copy over
/etc/solr/conf/schema.xml Configure your website to use the indexer Set the following values in
code-init-before-midcom:$GLOBALS['midcom_config_local']['indexer_reindex_allowed_ips'] = array ( '127.0.0.1', 'server.main.ip' ); $GLOBALS['midcom_config_local']['indexer_backend'] = 'solr'; $GLOBALS['midcom_config_local']['indexer_xmltcp_host'] = 'localhost'; $GLOBALS['midcom_config_local']['indexer_xmltcp_port'] = '8180';
If you get java.lang.NoClassDefFoundError in Tomcat logs you may need to disable Tomcat security
Using Jetty
Warning: This section is very old, we suggest using Tomcat
Dependencies
On Debian you need the following packages:
apt-get install libmx4j-java libregexp-java libsablevm-classlib1-java libservlet2.4-java libtomcat5.5-java libxerces2-java sun-java5-jdk
Installing Jetty
Solr comes with Jetty in the example directory.
Installing Solr
Note: You must use version 1.1 of Solr
Download Solr from the Solr website http://www.apache.org/dyn/closer.cgi/lucene/solr/
Unpack solr and copy the jetty example install to the jetty home.
unzip apache-solr-1.1\*.zip
cp -R apache-solr-1.1\*/example /usr/share/jetty
Download the setupfiles for Solr. (Currently just for Debian)
svn co https://svn.midgard-project.org/midgard/trunk/external-tools/indexer-backends/solr
cd solr
bash ./install-solr.sh
This will install setupfiles in the correct places and set the correct permissions.
Start solr
/etc/init.d/jetty start
Now solr is running and listening to requests on port 8983.
Create a topic with the Search component.
In the menu, choose website -> website configuration.
Set the following values:
Indexer: Solr
- Hostname of indexer xmltcp service: localhost (or the host solr is running on)
Port of indexer xmltcp service: 8983
Reindex your site. Visit
/midcom-exec-midcom/reindex.php. This will take some time.You should now be able to run searches on your site.
Security
In the addListener definition in jetty.xml, add the following:
<Set name="Host">localhost</Set>
So Jetty doesn't listen to requests from the outside. If you want to still access the admin interface, use firewall scripts to hide the port from most users.
See http://wiki.apache.org/solr/SolrSecurity for more information.
Troubleshooting
"Authorization required"
When you're running midcom-exec-midcom/reindex.php, and you get "Authorization required" errors, you should modify the indexer_reindex_allowed_ips. Either set it in /etc/midgard/midcom.conf or in the host settings.
For the midcom.conf file, you need to add:
$GLOBALS['midcom_config_site']['indexer_reindex_allowed_ips'] = array('127.0.0.1','192.168.126.128','127.0.1.1');
"Indexer failed"
If you get an "indexer failed" error when reindexing the site, ensure that SOLR's data directory exists and is writable:
mkdir /usr/share/jetty/solr/data
chown jetty /usr/share/jetty/solr/data
Building multilingual sites
With Midgard1 and above the recommended way is to use MultiLang feature even if the site structure isn't identical among different languages.
If content hasn't been translated will master language (language 0) be used.
Using multilang
mgd_set_lang(int language)
Languages are called with their ID. E.g. mgd_set_lang(38) would set the language to English and mgd_set_lang(183) to Inuktitut.
For the master language key 0 (zero) is used. Master language isn't fixed to any specific language, so it can be the main language, which other languages will be translated from.
Get the currently used languages
It is possible to use two languages simultaneously
- Content language
- Interface language
To get the content language use
<?php
// Get ID (integer) of the content language
$content_language = $_MIDCOM->i18n->get_content_language();
?>
And for the currently used interface language (e.g. toolbar) use
<?php
// Get ID (integer) of the current interface language
$interface_language = $_MIDCOM->i18n->get_current_language();
?>
Using parameters as storage location
To use multilanguage parameters with midcom.helper.datamanager2 it is possible to set the parameter storage location in the following way:
'price' => array
(
    'title' => 'price',
    'type' => 'text',
    'storage' => array
    (
        'location' => 'parameter',
        'multilang' => true,
    ),
    'widget' => 'text',
),
This will save the parameters
- midcom.helper.datamanager2, price, $value for the master language content
- midcom.helper.datamanager2, price_fi, $value for Finnish language content
Untranslated content
Component fi.protie.navigation will natively add class untranslated for content which is lacking the translation.
Otherwise untranslated content should be checked with
<?php
if ($object->lang !== $_MIDCOM->i18n->get_midgard_language())
?>
Hiding untranslated content
To hide untranslated content (otherwise master language will be displayed, resulting in displaying mixed language) set the MidCOM configuration parameter
$GLOBALS['midcom_config_local']['i18n_multilang_strict'] = true;
before initializing MidCOM in code-init.
Language versions for the requested object
To get a list of the language versions for a requested object do the following
MidCOM component level
<?php
// Get the metadata for the requested object
$object_metadata = midcom_helper_metadata::retrieve($object);

if (   $object_metadata
    && $object_metadata->id)
{
    $languages = $object_metadata->get_languages();
}
// returns an array with the languages
?>
On layout level
<?php
// Get the metadata binded to the object currently viewed
// if the component binds the metadata
$object_metadata = $_MIDCOM->metadata->get_view_metadata();

if (   $object_metadata
    && $object_metadata->id)
{
    $languages = $object_metadata->get_languages();
}
?>
Multilang and hosts
If host record has language other than 0, mgd_set_lang is automatically initialized to set the correct language.
To fetch a list of all the languages hosts use get an array containing the host objects with
<?php
$hosts = $_MIDCOM->i18n->get_language_hosts();
// Returns an array of languages, indexed with the language id as
// the array key for each language
?>
MySQL and object level
Several objects have two different types of properties: shared and language-dependant. For example table article shares e.g. name and the language content is located in article_i, which contains title, abstract, content and such.
Languages are located in table midgard_language.
midgard_query_builder will automatically set language constraint when applicable.
MidCOM formatting engine
Inline variable display
Midgard adds a new language construct to your PHP templates which allows you to include the value of a variable in HTML without using a <? echo $var; ?> construct.
You can now simply use &(variablename); directly in HTML. Note the absence of the $.
Object variables that would normally be accessed in PHP code as $object->field can be inserted as &(object.field);. Similarly, fields of an associative array can be inserted with &(array['key']);.
Standard formatting modifiers
The way the value is formatted can be specified by adding a modifier after the variable name: &(variable:modifier);.
In PHP code the modifiers can be executed using the mgd_format function.
The standard modifiers are:
h - Encode content as HTML
Add value as HTML. Escapes & to &, < to < and > to >.
Everything between [< and >] is added verbatim with the [< and >] dropped. PHP code embedded in such a section is executed.
H - Encode content as HTML but keep entities verbatim
Add value as HTML. Everything is included verbatim.
f - Format plain text to HTML
Add value as formatted text, the plain text input is formatted as HTML on the fly.
Paragraphs delimited by an empty line will be surrounded by <p> and </p>.
Everything between [< and >] is added verbatim with the [< and >] dropped.
Note: PHP code embedded in such a section is executed. If you want to enable safe content input from unsecure users, use the Markdown datatype instead.
F - Format plain text to HTML with headlines
Add value as formatted text, the plain text input is formatted as HTML on the fly.
Paragraphs delimited by an empty line will be surrounded by <p> and </p>.
Lines after an empty line with less than 10 words that do not end in a period are formatted as <h2>.
Everything between [< and >] is added verbatim with the [< and >] dropped.
Note: PHP code embedded in such a section is executed. If you want to enable safe content input from unsecure users, use the Markdown datatype instead.
p - Execute content as PHP code
Execute a value as PHP. Executes the value of the variable.
u - URL encode content
Add the value urlencoded. Replaces non-safe URI characters with their %code equivalents.
s - Show content as-is
Show variable unmodified.
Custom formatters
You can also add custom formatters to your Midgard application. This is a powerful way of extending Midgards formatting engine.
Basically you write a function which gets the text-to-be-formatted as an argument and echos dumps the formatted output to stdout.
You then register that function using to Midgard's formatting engine using the mgd_register_filter function.
Example:
function midgardize_my_content($text)
{
    // Replace all instances of "CMS" in content with "Midgard"
    $formatted_text = str_replace('CMS', 'Midgard', $text);
    echo $formatted_text;
}

mgd_register_filter('mgd', 'midgardize_my_content');

// Then, in some style element you can do this: &(my_variable:xmgd);
Note: The custom formatters are prefixed with x before the registered name (in this case mgd)
Error handling
MidCOM allows site developers to add their own error handling.
In all cases, the basic idea is to have a simple page in the Distribution itself and allow the site developer to add either style or page elements that can override the defaults.
Since Midgard Style Elements evaluate in the scope of the callee, each element will list a number of variables that can be accessed directly without having to global them in as it is required with MidCOM Style-Engine driven pages.
Since the Style Engine does not distinguish between page and style elements during execution, you can add the replacement elements where you like. Be aware though, that it is strongly encouraged to add the element in the Style, not the Page. The required style element names are given in the headings of the various sections.
Authentication related elements
The authentication pages are divided in three elements:
Login Form using the 'form' Authentication Frontend (midcom_services_auth_frontend_form)
This is the simplest part of it, it will add the actual login form to the generated pages. It is decopuled from the rest, because a) its behavoir is depended on the authentication frontend used and b) it needs to be reusable in the other two elements.
This tutorial assumes that you use the default 'form' frontend.
Currently, only the "form" authentication frontend is avaialbe, which renders a simple form that can be styled using CSS. Lets look at the default source first:
<form name="midcom_services_auth_frontend_form" action=""
    method="POST" id="midcom_services_auth_frontend_form">
    <label for="username">
    <?php echo $_MIDCOM->i18n->get_string('username', 'midcom'); ?>:
        <input name="username" id="username" />
    </label>
    <label for="password">
        <?php echo $_MIDCOM->i18n->get_string('password', 'midcom'); ?>:
        <input name="password" id="password" type="password" />
    </label>
    <input type="submit" name="midcom_services_auth_frontend_form_submit"
        id="midcom_services_auth_frontend_form_submit" value="<?php
        echo $_MIDCOM->i18n->get_string('login', 'midcom'); ?>" />
</form>
As you can see, you shouldn't have much trouble customizing this form by just generating appropriate CSS rules that are included in the actual error pages generated. If you need to replace this element nevertheless, ensure that the name of the various form elements are not changed in any way.
Login Page (midcom_services_auth_login_page)
The login page is shown if there is no authenticated user and either the systemwide login page is called, or some component calls $_MIDCOM->auth->require_valid_user().
It is similar to the regular error pages with a slightly different formatting not crying out "ERROR" as loud. These pages still add an HTTP 403 Forbidden Header to prevent search engines or any cache to interfere with the page.
Again, lets look at the source of the default page:
<!DOCTYPE html PUBLIC "-//W3C//DTD XHTML 1.0 Strict//EN"
    "http://www.w3.org/TR/xhtml1/DTD/xhtml1-strict.dtd">
<html xmlns="http://www.w3.org/1999/xhtml" lang="en" xml:lang="en">
<head>
<title><?php echo $title; ?></title>
<style type="text/css">
    body { color: #000000; background-color: #FFFFFF; }
    address { font-size: smaller; }
    a:link { color: #0000CC; }

    #login_warning { color: red; }
    p.login_message { }

    form label { margin-left: none; padding-left: none; display: block; }
    form label input { margin: 0.5ex 0 0 0; display: block; }
</form>
</style>
</head>

<body>
<h1><?php echo $title; ?></h1>

<p class='login_message'><?php
    echo $_MIDCOM->i18n->get_string('login message - please enter credencials',
    'midcom');?></p>

<?php echo $login_warning; ?>

<?php $_MIDCOM->auth->show_login_form(); ?>

<address>
    <a href="/"><?php echo $_SERVER['SERVER_NAME']; ?></a><br />
    <?php echo date('r'); ?><br />
    <?php echo $_SERVER['SERVER_SOFTWARE']; ?>
</address>
</body>
</html>
The important thing here is the fact that you are delivering a full HTML page at this point. It is rendered by the method midcom_services_auth::show_login_page(), which makes the following variables available:
$title:A localized page title generated by looking up the string 'login' in the main MidCOM L10n Database.$login_warning:This string is populated with a localized warning in case that the (last) login failed. It is automatically enclosed in a
paragraph with the CSS IDlogin_warningassigned to it. If there was no problem, the string is empty.
To add the actual login form, call $_MIDCOM->auth->show_login_form(), as shown in the example above. While it is theoretically possible to add the login form manually, this is strongly discouraged, as it breaks the modularity of the MidCOM authentication core.
Access Denied Page (midcom_services_auth_access_denied)
This page is shown on all failed permission checks other then $_MIDCOM->auth->require_valid_user() (see above for that one). It delivers a HTTP 403 Forbidden page which also includes the possibility to log in to the system using different credencials.
This is the default page:
<!DOCTYPE html PUBLIC "-//W3C//DTD XHTML 1.0 Strict//EN"
    "http://www.w3.org/TR/xhtml1/DTD/xhtml1-strict.dtd">
<html xmlns="http://www.w3.org/1999/xhtml" lang="en" xml:lang="en">
<head>
<title><?php echo $title; ?></title>
<style type="text/css">
    body { color: #000000; background-color: #FFFFFF; }
    a:link { color: #0000CC; }
    address { font-size: smaller; }

    #login_warning { color: red; }

    form label { margin-left: none; padding-left: none; display: block; }
    form label input { margin: 0.5ex 0 0 0; display: block; }
</form>
</style>
</head>

<body>
<h1><?php echo $title; ?></h1>

<p><?php echo $message; ?></p>

<h2><?php echo $_MIDCOM->i18n->get_string('login', 'midcom');?>:</h2>

<?php echo $login_warning; ?>

<?php $this->_auth_frontend->show_authentication_form(); ?>

<p><strong>Error 403</strong></p>
<address>
    <a href="/"><?php echo $_SERVER['SERVER_NAME']; ?></a><br />
    <?php echo date('r'); ?><br />
    <?php echo $_SERVER['SERVER_SOFTWARE']; ?>
</address>
</body>
</html>
As you can see, this is quite similar to the Login page, with the main difference that it is more error-like. Therefore, all of the annotations from the login form and its usage do also count for the Acccess Denied element, with the single addition of another variable:
$message:includes the reason why the access to the page failed. It is localized (at least when coming from the MidCOM ACL core) and outlines the nature of the failed privilege check.
Styling of the other MidCOM Error pages
These pages are generated by calls to $_MIDCOM->generate_error(). They indicate critical errors which prevent a page from being processed completly.
4xx Standard Error pages (midcom_error_4xx)
Currently, the framework knows these error conditions in the 4xx cateogory:
- 404 Not Found: This is the case happening most often, indicating that an element requested by the user could not be found.
- 401 Unauthorized: This is a legacy error code, that is not in wide use right now. I have not yet decided what to do with it.
- 403 Forbidden: Normally, 403 errors are now handled by the ACL framework (see above). In the unlikly case however, that the ACL service has not yet started up, the core must deliver the corresponding error message.
All of the errors mentioned above are delivered using the style element with their appropriate error code appended. So not found will call midcom_error_404.
The basic error page looks like this:
<!DOCTYPE html PUBLIC "-//W3C//DTD XHTML 1.0 Strict//EN"
    "http://www.w3.org/TR/xhtml1/DTD/xhtml1-strict.dtd">
<html xmlns="http://www.w3.org/1999/xhtml" lang="en" xml:lang="en">
<head>
<title><?echo $title; ?></title>
<style type="text/css">
    body { color: #000000; background-color: #FFFFFF; }
    a:link { color: #0000CC; }
    p, address {margin-left: 3em;}
    address {font-size: smaller;}
</style>
</head>

<body>
<h1><?echo $title; ?></h1>

<p>
<?echo $message; ?>
</p>

<h2>Error <?echo $code; ?></h2>
<address>
    <a href="/"><?php echo $_SERVER['SERVER_NAME']; ?></a><br />
    <?php echo date('r'); ?><br />
    <?php echo $_SERVER['SERVER_SOFTWARE']; ?>
</address>
</body>
</html>
Again, we have a few variables available at your disposal:
$title:contains the currently not localized clear-text name of the error as it is defined in the HTTP specs.$message:This is the error message that should be shown to the user. It depends on the calling component whether this string is localized or not.$code:contains the integer response code sent to the browser.$header:contains the full HTTP/1.0 response code which has been sent to the browser already. You should normally not need this variable.
500 Internal Server Errors
This type of error page is not styleable by the site developer, as it is thrown in many places where critical errors occur. Since you can use regular MidCOM functions during rendering a customized error page, the possibility of an error throwing an error is perfectly possible, which is why the HTTP 500 error remains hardcoded (and simple).
Acting on errors
For a long time, MidCOM has been mapping various types of system errors to various HTTP status codes, and has made it possible to create customized templates for displaying them.
Error actions, on the other hand, allow other actions to take place. Some examples:
- Log all 404 Not Found page URLs into a special log file alongside their referrers
- Send all 500 Internal Errors with debug stacktrace to the site developer
To enable error actions, tweak your MidCOM config in the following way:
$GLOBALS['midcom_config_local']['error_actions'] = array
(
    500 => array
    (
        'action' => 'email',
        'email' => 'webmaster@example.net',
    ),
    404 => array
    (
        'action' => 'log',
        'filename' => '/var/log/broken_links.log',
    ),
);
Single sign-on with Drupal
This instruction supposes that you are installing MidCOM website in a subdomain of Drupal website and that MidCOM has access to Drupal's host filesystem and database. For example: Drupal at example.com and MidCOM at midcom.example.com. It is possible to achieve similar results in other environments, but process would become a bit more complicated
Drupal side
- install "erl" (External Redirector after Login) module available from github repo
- enable "erl" module from Drupal's administration UI. It will register erl/login, erl/logout and erl/return URLs
- in "erl" module's settings add MidCOM's hostname to the list of allowed domains.
MidCOM side
- make sure, that php's pdo_mysql extension is enabled (or pdo_pgsql, if Drupal uses PostgreSQL database)
- install "net.nemein.drupalauth" component from midgard's svn repo (8.09.8.25504+)
- make sure, that midcom.core's version is 8.09.8.25505 or newer (update if necessary)
- in MidCOM's website-settings (available via Asgard) set 3 config-variables:
- Path to Drupal's settings.php file => "/usr/share/drupal6/sites/default/settings.php" (set whatever is right for your setup)
- Drupal's domain => "example.com" (according to our imaginary setup, set real domain of your Drupal host)
- Enable authentication via Drupal => "Yes"
Done. As soon as you press "Save" button MidCOM won't allow you to authenticate using midgard logins/passwords anymore. You will need to use Drupal's credentials.
Hint: create "admin" account in Drupal. It will connect to midgard's "admin" account and you will be able to proceed with this instruction
Edit your MidCOM styles to have the following links:
- http://example.com/?q=erl/login for "Login" link (remember to replace "example.com" with your Drupal's site hostname)
- http://example.com/?q=erl/logout for "Logout" link
- http://example.com/?q=user/register for "Register" link
- http://example.com/?q=user for "My Account" link
check how we did it for meego.com demo-site here
Component configuration
MidCOM components use a configuration system to make their behaviour customizable. The configuration system is based on defining configuration keys with values that the site builder can change.
The configuration can be modified on three different levels:
- Global configuration shipping with the component: stored in files
- Sitegroup -specific configuration: stored in snippets
- Folder -specific configuration: stored in folder parameters
Configuration file format
The file format used for the configuration file and the sitegroup configuration snippets is in the PHP associative array format but without the starting <?php tags:
'results_per_page' => 10,
Component's default configuration
The default values for component's configuration reside in the component's config/config.inc file.
Sitegroup-specific configuration
Custom configuration snippets for MidCOM components can be placed in config snippet, which is placed in snippet directory /sitegroup-config/<component name>/. This can be done eg. in Asgard on the Snippets tab.
In most components, it is possible to define the default Datamanager2 schema of the sitegroup and - depending on the component - define an array of schemas to choose from in component configuration.
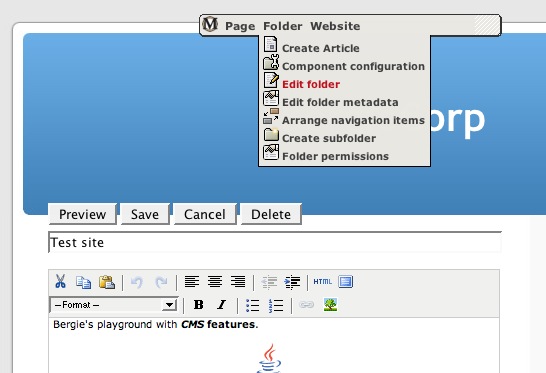
Inline AJAX editing
MidCOM has the capability of supporting inline editing of content with its so-called Ajax Editor. This will make all content shown on pages editable when user double clicks it. The DOM element containing that piece of content turns into a form element, with the necessary Save, Preview and Cancel buttons.
AJAX editing can be enabled in site's MidCOM configuration (code-init element) with:
$GLOBALS['midcom_config_local']['enable_ajax_editing'] = true;
AJAX editing and Suhosin
Since the AJAX editing feature uses quite long HTTP query parameters, it doesn't work by default with the PHP Suhosin security extension enabled. To make it work, edit your php.ini:
suhosin.get.max_name_length = 128
suhosin.request.max_varname_length = 128
MidCOM coding standards
For a start, please read the PEAR coding standards, they are the basis for the MidCOM conventions, as they are only slightly adapted. If in doubt, you should stick to PEAR.
Indenting and Line Length
You must set your IDE for a tab with of four spaces and must configure it to replace tabs with spaces.
You should break lines at around 100-120 characters, use your best judgement here, readable code goes over this wrapping recommendation. Any statement you break over several lines should generally be indented by one tab,you should not increase the indentation to the opening paranthesis, the equal sign or whatever you are in when doing a line break. One noteable exceptions are muli-line if/while constructs, but see below.
Curly braces
You must use curly braces in all places where they might be optional. This is especially important for if/while/for single-liners, where omitted curly braces can easily lead to strange bugs.
In addition, to the contrary of what both PEAR and current MidCOM code is suggesting, you have to put the opening curly brace in its own line. While working with the C# coding standards (where this is mandatory), I found out that this greatly improves the readability of the code.
So it has to look like this:
if (condition)
{
    action1;
}
else if (condition)
{
    action2;
}
else
{
    action 3;
}
Control structures
The C language spelling has to be used throughout MidCOM. No Perl-Like constructs or shortcuts like 'elseif' are allowed. Use of the "ternary" ('?:') operator is expressly forbidden as is the "alternative" control structure syntax.
If-statements
A complete if statement can be seen above.
More complex conditions should be wrapped over multiple lines using indenting to mark the various levels of the condition:
if (   $this->_layout[!!'locktimeout'] == 0
    || (   is_array($this->_lock)
        && $this->_ourlock
       )
    || is_null($this->_storage)
   )
{
    ...
}
Switch statements
A bit to the contrary of PEAR, switch blocks must use two levels of indentation, to clearly mark the extent of the switch block. Any fall-throughs should get a short comment to let other programmers know that it was on-purpose. The default action must always come last and should also be terminated by a break statement.
switch (condition)
{
    case 1:
        action1;
        break;

    case 2:
        action2;
        // Fall-through

    case 3:
        action3;
        break;

    default:
        action4;
        break;
}
Loops
All loops follow the basic schema of the formatting of simple if-blocks. You may group for statements and conditions together in a similar way too.
Whitespace
Rule number one here: Code has to be read by the author, not by the PHP parser. So you should make use of whitespace everywhere to make code more readable.
In all statements, you must add a space before and after operators. In addition, when calling functions, you must add a space after each comma between the arguments. You should omit the spaces inside parantheses to make the code optically 'coherent'.
Statement blocks that are logically related should be marked by a single, blank line (that has the same indentation as the surrounding ones). You should not use more blank lines, as they tend to rip apart the 'flow' of the code, especially when they are at places where you don't need them (e.g. at the end of a block).
$variable = 4 * (3 + 7);
$variable2 = 'string1' . 'string2';

someotheraction1;
someotheraction2;
Strings
Strings should always be single-quoted when you do not need any special characters (for example \n) or any variable interpolation. This will avoid accidential variable expansions. The only drawback here is that you have to mask strings like 'shouldn\'t' but these short forms should not be used in a UI anyway.
If you use variable interpolation in double-quoted strings, you must always enclose the interpolated variable in curly braces to clearly mark it against the surrounding text. You should use variable interpolation whenever feasible.
$string1 = 'You should not use terms like "shouldn\'t".';
$string2 = "This {$color} is in back {$this->bags[$color]['bag name']}.\n";
NOTE: Interpolating function/method calls via curly brackets is forbidden, use concatenation (and remember those spaces around the operator).
Naming conventions
Due to tradition, MidCOM naming conventions differ from the PEAR ones:
Classes
Classes must start with their component prefix, and must all be lowercase, for example de_linkm_taviewer_admin. You should use an additional underscore after the component prefix to denote component-private classes, that should not be instantinated from outside, for example net_siriux_photos__photo.
Functions and methods
As with classes, they must all be lowercase. Global functions must start with their component prefix, as classes have to. Try to name class methods clearly, use a longer name in favor of saving typework. Prepend any private member functions with an underscor. For example _generate_urlname(). or get_current_leaf().
The same schema must be used for all public member variables as well.
Note: Some older MidCOM classes, even in the core, do use the CamelCaps syntax instead of the underscore separated. It seems to me (subjectivly) that we have more underscore separated symbol names, instead of CamelCase ones, so I have decided to stick to this one as a recommendation.
Symbol names
Finally, use must clear names for your symbols (Constants, Variables, Functions etc.) always. Do not use stuff like $st (for style) or $tn (for topic name). This makes it hell for other authors to even read your code.
Instead, use clear descriptive names like lock_timeout. You may use CamelCaps style for function-local variables if it serves readability, but you should not do so for private class members for consistency with public ones.
All of your constants should be all-upper-case to indicate their constant nature. One exception are the values true, false and null, all of which I consider as language constructs and therfore are to be kept lower-case.
PHPDoc blocks
A sample PHPDoc block (as started by me) looks like this, note the empty line at the beginning:
/**
 * Short symbol introduction
 *
 * Exthaustive text, possibly with examples
 *
 * @param type name description
 * @param type name description
 * @return type description
 * @access private
 * @package name
 * @further_tags like @todo or @global ...
 */
The last tags, of course, should only be used where applicable. Important, for example, is that the @package tag is part of a class definition as well as of a file docblock, otherwise PHPDoc doesn't correctly recognize the package assignment. All other file-level blocks don't need @pacakge thoug.
In addition, each file should contain a DocBlock like this as file-level docblock to get a correct assignment to a package:
/**
 * @package midcom.baseclasses
 * @author The Midgard Project, http://www.midgard-project.org
 * @version $Id: dbobject.php,v 1.3 2005/06/08 15:18:55 torben Exp $
 * @copyright The Midgard Project, http://www.midgard-project.org
 * @license http://www.gnu.org/licenses/lgpl.html GNU Lesser General Public License
 */
The name of the package is alwas that of the component (de.linkm.taviewer for example).
See the PHPDoc Manual for further details.